

-
Introduction to Pfumvudza and Conservation Agriculture4 Kappaleet
-
Planning and Preparing the Pfumvudza Plot4 Kappaleet
-
Soil Management and Mulching4 Kappaleet
-
Digging Planting Basins (Planting Holes)4 Kappaleet
-
Sowing and Planting Techniques4 Kappaleet
-
Crop Management and Care4 Kappaleet
-
Harvesting and Post-Harvest Handling4 Kappaleet
-
Climate Resilience and Sustainability Practices4 Kappaleet
-
Economic and Social Aspects4 Kappaleet
-
Practical Field Sessions and Demonstrations4 Kappaleet
-
Partnership with Finnish education experts2 Kappaleet
Osallistujat 12
Applying Organic Mulch: Materials and Techniques

Jukka 9.5.2025
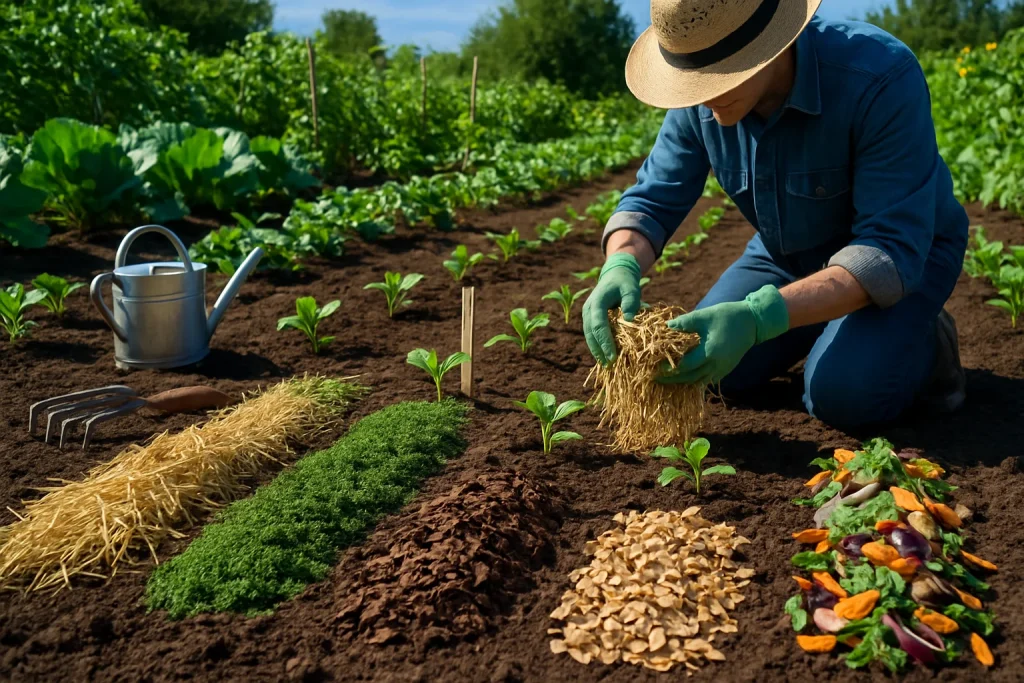
Welcome to the enchanting world of organic mulch! In this topic, we will dive into the art and science of selecting and applying organic mulch effectively for your bountiful crops, empowering you to become a guardian of your garden.
What is Organic Mulch?
Organic mulch is a wonderful ally in your quest for sustainable agriculture. It consists of biodegradable materials that decay over time, enriching the soil while also providing a protective blanket for your plants. Think of it as a gentle hug that nurtures your crops, all while fighting off the surging gang of weeds and preserving that sweet, precious moisture.
Selecting the Perfect Organic Mulch
Choosing the right type of organic mulch is akin to selecting the finest ingredients for a gourmet recipe. Here are a few delightful options to consider:
1. Straw
Hollow golden stalks of straw can guard your plants against weeds and maintain soil temperature. It’s ideal for annual crops.
2. Grass Clippings
Freshly cut grass can deliver a nutrient buffet to your soil. However, use them wisely and layer them thinly to prevent a smothering effect.
3. Shredded Leaves
These autumn treasures are not only beneficial but also free! As they break down, they fashion a delightful nutrient-rich layer for your soil.
4. Wood Chips or Bark Mulch
For a sturdier shield, use wood chips or bark mulch. They last longer and enhance the beauty of your garden while keeping the moisture trapped.
5. Kitchen Scraps
Old fruit and vegetable peels, coffee grounds, and eggshells make incredible candidates for your organic mulch. They work wonders in fortifying the soil.
Applying Organic Mulch with Masterful Techniques
Now that you’ve gathered your mulch materials, it’s time to work some magic in your field. Follow these enchanting steps:
Step 1: Prepare Your Field
Begin by marking out your field during the winter with permanent pegs; it’s like preparing the stage for a grand performance. Ensure the area is weed-free. Remember, weeds are the foe of clean garden vibes!
Step 2: Weed and Mulch
Once your plot is free from weeds, embrace the soil with organic mulch! Lay down a layer of your selected mulch material generously so that it serves as a protective barrier. Aim for at least 5-10 cm thickness – like a well-crafted quilt for your plants.
Step 3: Digging Planting Stations
As you design your planting layout, dig planting stations in a methodical pattern, with rows running across the slope. You’ll need 52 rows – each 75 cm apart with each planting station spaced 60 cm apart in the row, ultimately crafting a cohesive system that works in perfect harmony with nature. You can celebrate the anticipation of sowing by marking their positions carefully!
Step 4: Enriching the Soil
With your planting stations in place, enhance your mulch masterpiece by applying lime (approximately 1363 cups) and compost (a delightful 350 ml tin) per plot. Follow with a luscious basal fertilizer (8 cups). Cover these materials with a light layer of soil, leaving about 3 cm for your planting! It’s like tucking your seeds into bed for a nourishing sleep.
Step 5: Final Mulching Touches
After planting your seeds (3 seeds per hole) and watering each station (20 liters of water), return to your mulch. Add one final layer around your young seedlings to keep the soil snug and warm. This is the ultimate serenade to your crops as they flourish and grow.
Step 6: Upkeep and Care
As the seasons shift, revisit your mulched areas. Maintain vigilance by ensuring the mulch remains intact and replenished. Mother Nature loves a spectacular show, and with diligence, you can create a thriving landscape that sings in colors of health and abundance.
Summary
Congratulations, dear farmer! You now have the tools to choose and apply organic mulch effectively for your crops. As you prepare to cultivate your bountiful harvest and entertain dreams of joyful feasts with your family, keep our lessons on mulch close to your heart. Remember, it’s more than mulch; it’s a transformative journey that celebrates the beauty of nature!
Through the diligent application of organic mulch, you are on the path toward abstract artistry in your field—a masterpiece of sustainable farming practices empowered by the Pfumvudza method. Here’s to harvesting the fruits of your labor and nourishing your community! 🌱✨