

-
Introduction to Pfumvudza and Conservation Agriculture4 Kappaleet
-
Planning and Preparing the Pfumvudza Plot4 Kappaleet
-
Soil Management and Mulching4 Kappaleet
-
Digging Planting Basins (Planting Holes)4 Kappaleet
-
Sowing and Planting Techniques4 Kappaleet
-
Crop Management and Care4 Kappaleet
-
Harvesting and Post-Harvest Handling4 Kappaleet
-
Climate Resilience and Sustainability Practices4 Kappaleet
-
Economic and Social Aspects4 Kappaleet
-
Practical Field Sessions and Demonstrations4 Kappaleet
-
Partnership with Finnish education experts2 Kappaleet
Osallistujat 12
Measuring and Marking the Standard Plot Size (16m x 39m)

Jukka 9.5.2025
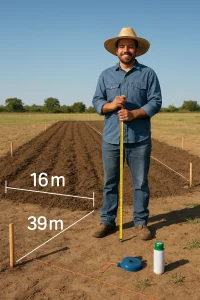
Welcome, intrepid farmer! Today we embark on a tactile journey — one where your measuring tape transforms into a magic wand empowering you to shape the land that provides for you and your family. In this section, we will master the art of measuring and marking your Pfumvudza plot with the precise dimensions of 16m by 39m. So, roll up those sleeves, put on your thinking cap, and let’s get ready to cultivate not just the land, but also the hope and sustenance it holds!
Introduction to Plot Measurements
Before we dive into the nuts and bolts of measuring our plot size, let’s take a moment to appreciate the rationale behind these specific dimensions. As small-scale farmers, the goal is not only to sustain our families but to do so efficiently. The Pfumvudza model has been finely crafted to yield a week’s worth of maize while utilizing precise measurements that convince the soil to nourish its crops abundantly. Each plot (16m x 39m) is our canvas, a vital resource to draw food, income, and growth from.
1. Gather Your Materials!
To start our plotting adventure, make sure you have the following tools by your side:
- A measuring tape (at least 50m)
- Permanent pegs or stakes
- A marker or some biodegradable paint (to mark dimensions)
- A string line (optional, but highly useful)
"Remember, it’s not just about marking lines; it’s about defining a productive future!"
2. Clearing and Setting Your Space
Begin by ensuring your designated area is free of weeds and debris. We want nothing but a smooth sailing surface litter-free to kick start this ambitious journey. This moment sets the tone for the end result; by creating a clean canvas, your efforts shall pay off tenfold!
3. Measuring Out the Dimensions
Now, let’s get to the good part – measuring and marking our plot:
-
Long Side (39m):
- Choosing one corner of your land as the starting point, unravel your measuring tape to catch the first breeze of 39 meters. Once you’ve reached your mark, insert a permanent peg firmly into the ground.
-
Short Side (16m):
- Now, pivot from your peg and measure along one side to 16 meters. Another peg awaits its moment to shine.
-
Completing the Rectangle:
- From the second peg you just placed, measure back to the primary peg to ensure you have a right angle. Now, lay out your measuring tape again to create a perfect rectangle. Continue the process until you complete the shape by marking down the remaining lines.
“What you’re sketching on the ground is more than just measurements; it’s the blueprint for a bountiful harvest!”
4. Marking the Plot
With your dimensions marked and pegs safely in place, take your biodegradable paint (or any other environmentally friendly marker) and trace along the lines delineated by your pegs.
This will serve as a clear outline of your 16m x 39m plot. Marking helps in countless ways:
- Reduces confusion for subsequent planting and maintenance.
- Provides a roadmap to navigate your space and maximizes utilization.
- Helps vision of what’s to come — rows of maize leading to triumphant harvests!
5. Double-check the Alignment
Like a compass that always points north, we must ensure our plot remains true to dimensions:
- Use your measuring tape to confirm all corners are exactly 39 meters and 16 meters.
- Walk the perimeter and visually inspect. Straight lines should brush with smoothness!
6. Reflect and Engage
Congratulations! By mastering the complexities of measuring and marking your Pfumvudza plot, you’ve set yourself up for exhilarating success. Take a moment to stand in your newly defined space. Picture the growth of healthy maize, the gentle rustle of leaves, and the prospects of plenty!
Feel free to share your experience or ask questions based on what you’ve learned. Utilize your newfound expertise to create a movement in your community. Remember, every measure contributes towards community growth — together, we cultivate a brighter future!
Let’s Cultivate Victory!
With your plot laid out like a chef’s perfect appetizer, the next chapters of the Pfumvudza journey will reveal how to prepare soil, plant, nurture, and ultimately reap the harvest. Hand in hand, let’s get ready to transform your land into a treasury of food and abundance!
Arise! The harvest awaits! 🌽✨
Now, if you’re excited to continue, please head over to the next topic: Digging Planting Stations for an Abundant Future!